
Printers : Epson L1300 - Version: (Ver. 2.12)
EPSON L1300 Series Specifications - Download driver EPSON L1300
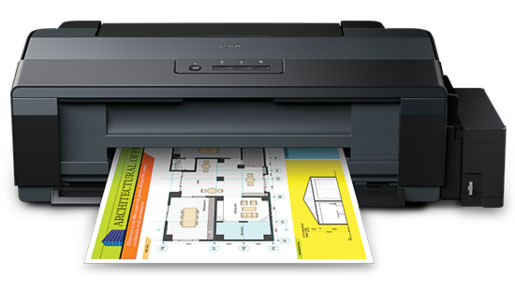
FAST AND COST-EFFECTIVE DOCUMENT PRINTER IN A COMPACT SIZEThe Epson L1300 ink tank system printer brings speedy performance with low running costs to all your personal and work projects.
High-yield ink bottles
Print speed up to 8.5ipm for black-and-white and 4.5ipm for color
Compact Size
Warranty of 2 Years or 20,000 Pages, whichever comes first
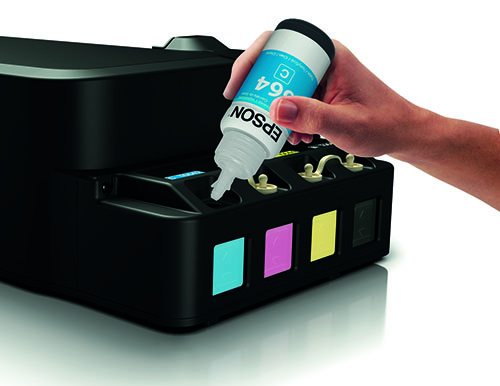
Ultra low-cost replacement ink - Bag Easily refillable ink tanks Prints Up to A3+
With the L1300, you have the option to print larger documents up to A3+ size. This opens up possibilities for superior presentations of detailed CAD drawings, floor plans, business reports and charts that go beyond the ability of typical A4 printers.
Superb Savings and Page Yield
High capacity integrated ink tanks and highly affordable genuine ink bottles at just US$5.50 each add up to greater savings. With a bundled starter kit of 5 bottles of Epson Ink, the L1300 yields up to 7,100 pages (black)*.
Quoted yields are extrapolated based on Epson original methodology from the print simulation of Test Patterns provided in ISO/IEC 24712. Quoted yields are NOT based on ISO/IEC 24711. Actual yields may vary depending on manner of usage and print pattern. 7100 pages is based on yield from two black ink bottles.
Designed for High Productivity
The L1300 features an advanced printhead to achieve fast print speeds of up to 15ipm (black).
Super Reliability and Print Quality
Designed for continuous printing performance, Epson’s renowned Micro Piezo™ printhead is not only highly reliable in operation, it also delivers an astoundingly high resolution of 5760dpi. When paired with genuine Epson formulated inks, the L1300 delivers exceptionally high quality prints for all your business and creative needs.
Media Flexibility
The L1300 comes with a rear-feed tray that accepts a wide variety of printing media, including thick paper, photo paper, envelopes, labels and more that allows you to accomplish all manner of printing jobs with ease.
Hassle-free Operation
Epson’s original ink tank system is designed for smooth, no-mess operation in corporate and SOHO environments.
Quality That Shines. Value That Lasts.
Epson genuine ink bottles are individually sealed to ensure the purity of its contents and formulated to deliver outstanding high-volume print quality with L-Series printers. Choose Epson genuine ink bottles to enjoy lasting quality with your L-Series printer and low printing costs.
1-Year Warranty for Peace of Mind
Enjoy warranty coverage of one year or 30,000 prints, whichever comes first, for maximum value from your printer and freedom from maintenance worries.
EPSON L1300 Printing Technology
Print Method: On-demand inkjet (Piezoelectric)Maximum Print Resolution: 5760 x 1440 dpi (with Variable-Sized Droplet Technology)
Minimum Ink Droplet Volume: 3pl
Automatic Duplex Printing: No
Black Nozzle Configuration: 360
Colour Nozzle Configuration: 59 per colour (Cyan, Magenta, Yellow)
Print Direction: Bi-directional printing, Uni-directional printing
Print Speed:
Photo Default - 10 x 15 cm / 4 x 6 " *2: Approx. 58 sec per photo (with Border) *1
Max Photo Draft - 10 x 15 cm / 4 x 6 " *2: Approx. 31 sec per photo (with Border) *1
Draft, A4 (Black / Colour): Approx. 30 ppm / 17 ppm *1
ISO 24734, A4 Simplex (Black / Colour): Approx. 15 ipm / 5.5ipm *1
Epson L1300 Paper Handling:
Number of Paper Trays: 1
Standard Paper Input Capacity: Up to 100 sheets, A4 Plain paper (75g/m2), Up to 20 sheets, Premium Glossy Photo Paper
Output Capacity: Up to 50 sheets, A4 Plain paper, Up to 30 sheets, Premium Glossy Photo Paper
Maximum Paper Size: 12.95 x 44"
Paper Sizes: A3+, A3, B4, A4, A5, A6, B5, 10x15cm (4x6), 13x18cm (5x7"), 16:9 wide size, Letter (8.5x11"), Legal (8.5x14"), Half Letter (5.5x8.5"), 9x13cm (3.5x5"), 13x20cm(5x8"), 20x25cm(8x10") Envelopes: #10(4.125x9.5") DL(110x220mm), C4 (229x324mm), C6(114x162mm)
Paper Feed Method: Friction feed
Print Margin: 3mm top, left, right, bottom
Epson L1300 Connectivity:
Standard USB 2.0
Epson L1300 Supported OS and Applications:
Supported OS: Windows XP / Vista / 7 / 8 / 8.1 / 10 , Mac OS X 10.5.8 or later
Epson L1300 Consumables:
Standard Capacity Black: 7,100 pages *3 (2 bottles of black ink) - T6641
Standard Capacity Cyan: 5,700 pages (Composite Yield) *3 - T6642
Standard Capacity Magenta: 5,700 pages (Composite Yield) *3 - T6643
Standard Capacity Yellow: 5,700 pages (Composite Yield) *3 - T6644
Epson L1300 A3 Ink Tank Printer Ink
Ultra High Capacity
Epson's new Ink Tank replacement ink bottles offer thousands of vivid prints at an ultra low cost, while delivering uncompromised quality. Ideal for everyday printing, these ultra high-capacity inks go longer between refills for unbeatable convenience.
Epson L1300 Color Ink Code
Black Ink Bottle T664 Cyan Ink Bottle T664 Magenta Ink Bottle T664 Yellow Ink Bottle T664
EPSON L1300 Series Driver Download
Driver EPSON L1300 Series Download for Windows 64-bitModel: EPSON L1300 Series - Download driver epson L1300
Compatible systems : Windows 10 64-bit, Windows 8.1 64-bit, Windows 8 64-bit, Windows 7 64-bit, Windows XP 64-bit, Windows Vista 64-bit
ET-14000 Series, L120 Series, L1300 Series, L1800 Series drivers download for MAC
Models: ET-14000 Series, L120 Series, L1300 Series, L1800 Series
Mac OS X - PowerPC, Mac OS X - Intel
E-Web print
Compatible systems : Windows 10 64-bit, Windows 8.1 32-bit, Windows 8.1 64-bit, Windows 8 32-bit, Windows 8 64-bit, Windows 7 32-bit, Windows 7 64-bit, Windows XP 32-bit, Windows XP 64-bit, Windows Vista 32-bit, Windows Vista 64-bit
Setting up/using EPSON L1300
- Do not block or cover the vents and openings in the product.- Use only the type of power source indicated on the product’s label.
- Avoid using outlets on the same circuit as photocopiers or air control systems that regularly switch on and off.
- Avoid electrical outlets controlled by wall switches or automatic timers.
- Keep the entire computer system away from potential sources of electromagnetic interference, such as loudspeakers or the base units of cordless telephones. The power-supply cords should be placed to avoid abrasions, cuts, fraying, crimping, and kinking. Do not place objects on top of the power-supply cords and do not allow the power-supply cords to be stepped on or run over. Be particularly careful to keep all the power-supply cords straight at the ends and the points where they enter and leave the transformer.
- If you use an extension cord with the product, make sure that the total ampere rating of the devices plugged into the extension cord does not exceed the cord’s ampere rating. Also, make sure that the total ampere rating of all devices plugged into the wall outlet does not exceed the wall outlet’s ampere rating.
- If you plan to use the product in Germany, the building installation must be protected by a 10 or 16 amp circuit breaker to provide adequate short-circuit protection and over-current protection for the product.
- When connecting the product to a computer or other device with a cable, ensure the correct orientation of the connectors. Each connector has only one correct orientation. Inserting a connector in the wrong orientation may damage both devices connected by the cable.
- Place the product on a flat, stable surface that extends beyond the base of the product in all directions. If you place the product by the wall, leave more than 10 cm between the back of the product and the wall. The product will not operate properly if it is tilted at an angle.
- When storing or transporting the product, avoid tilting it, placing it vertically, or turning it upside down; otherwise ink may leak.
- Allow spaces behind the product for the cables, and space above the product so that you can fully raise the front cover.
- Avoid places subject to rapid changes in temperature and humidity. Also, keep the product away from direct sunlight, strong light, or heat sources.
- Do not insert objects through the slots in the product.
- Do not put your hand inside the product during printing.
- Do not touch the white flat cable and ink tubes inside the product.
- Do not use aerosol products that contain flammable gases inside or around the product. Doing so may cause fire.
- Do not move the print head by hand; otherwise, you may damage the product.
- Always turn the product off using the P button. Do not unplug the product or turn off the power at the outlet until the P light stops flashing.
- Before transporting the product, make sure that the print head is in the home (far right) position. If any of the ink tanks are not filled up to the lower line, refill the ink soon. Continued use of the product when the ink level is below the lower line on the tanks could damage the product.
- If you are not going to use the product for a long period, be sure to unplug the power cord from the electrical outlet.
Printer Driver and Status Monitor
The printer driver lets you choose from a wide variety of settings to get the best printing results. The status monitor and the printer utilities help you check the product and keep it in top operating condition. Note for Windows users:- Your printer driver automatically finds and installs the latest version of the printer driver from Epson’s Web site. Click the Software Update button in your printer driver’s Maintenance window, and then follow the on-screen instructions. If the button does not appear in the Maintenance window, point at All Programs or Programs in the Windows Start menu, and check in the EPSON folder.
- If you want to change the language of the driver, select the language you want to use from the Language setting in your printer driver’s Maintenance window. Depending on the location, this function may not be available.
Accessing the printer driver for Windows
You can access the printer driver from most Windows applications, the Windows Start menu, or the taskbar. To make settings that apply only to the application you are using, access the printer driver from that application. To make settings that apply to all of your Windows applications, access the printer driver from the desktop or the taskbar.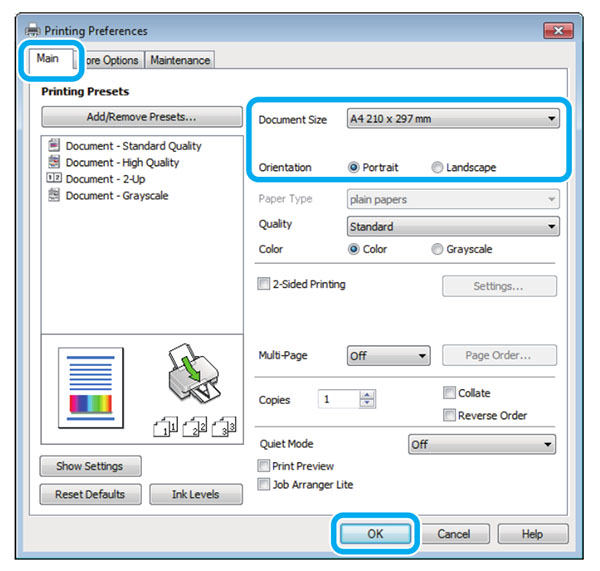
Basic epson L1300 settings for Windows
- Open the file you want to print.- Access the printer settings.
- Click the Main tab.
- Select the appropriate Document Size setting. You can also define a custom paper size.
- Select Portrait (tall) or Landscape (wide) to change the orientation of your print.
- Click OK to close the printer settings window.
- To make changes to advanced settings, refer to the relevant section.
- Print your file.
Basic epson L1300 settings for Mac OS X
- Open the file you want to print.- Access the Print dialog box.
- If the simplified dialog box is displayed, click the Show Details button (for Mac OS X 10.9, 10.8 or 10.7) or the button (for Mac OS X 10.6 or 10.5) to extend this dialog box.
- Select the product you are using as the Printer setting.
- Select the appropriate Paper Size setting.
- Select the appropriate Orientation setting.
- Select Print Settings from the pop-up menu.
- Click Print to start printing.
Canceling printing
If you need to cancel printing, follow the instructions in the appropriate section below.Using the product button
Press y to cancel a print job in progress.
For Windows You cannot cancel a print job that has been completely sent to the product. In this case, cancel the print job by using the product.
Setting up the epson L1300 as a shared printer
- To set up the product as a shared printer in Windows 8, 7 or Vista, you will need an account with administrator privileges and the password if you log on as a standard user.- To set up the product as a shared printer in Windows XP, you must log on to a Computer Administrator account. Follow the steps below on the computer that is connected directly to the product:
Windows 8:
Select Desktop, Settings charm, and Control Panel. Then select Devices and Printers from the Hardware
and Sound category.
Windows 7:
Click the start button, select Devices and Printers.
Windows Vista:
Click the start button, select Control Panel, and then select Printer from the Hardware and Sound category.
Windows XP:
Click Start and select Control Panel, and then select Printers and Faxes, from the Printers and Other
Hardware category.
Setting up the product as a shared printer
- To set up the product as a shared printer in Windows 8, 7 or Vista, you will need an account with administrator privileges and the password if you log on as a standard user.- To set up the product as a shared printer in Windows XP, you must log on to a Computer Administrator account. Follow the steps below on the computer that is connected directly to the product:
Windows 8:
Select Desktop, Settings charm, and Control Panel. Then select Devices and Printers from the Hardware and Sound category. Windows 7:
Click the start button, select Devices and Printers.
Windows Vista:
Click the start button, select Control Panel, and then select Printer from the Hardware and Sound category.
Windows XP:
Click Start and select Control Panel, and then select Printers and Faxes, from the Printers and Other Hardware category.
Select Share this printer, then type a Share name.
If you want to automatically download printer drivers for computers that are running different versions of Windows, click Additional Drivers and select the environment and the operating systems of the other computers. Click OK, then insert the product software disk.
Click OK or Close (if you installed additional drivers).
Ink Bottle Safety Instructions, Precautions, and Specifications
Safety instructionsObserve the following when handling the ink:
- Keep ink bottles and the ink tank unit out of the reach of children. Do not allow children to drink from or handle the ink bottles and ink bottle cap.
- Do not tilt or shake an ink bottle after removing its seal; this can cause leakage.
- Be careful not to touch any ink when you handle the ink tanks, ink tank caps, and opened ink bottles or ink bottle caps.
If ink gets on your skin, wash the area thoroughly with soap and water.
If ink gets into your eyes, flush them immediately with water. If discomfort or vision problems continue after
a thorough flushing, see a doctor immediately.
If ink gets into your mouth, spit it out immediately and see a doctor right away.
Precautions on refilling ink in EPSON L1300
Read all of the instructions in this section before refilling ink.- Use ink bottles with the correct part number for this product.
- Epson recommends the use of genuine Epson ink bottles. Epson cannot guarantee the quality or reliability of non-genuine ink. The use of non-genuine ink may cause damage that is not covered by Epson’s warranties, and under certain circumstances, may cause erratic product behavior.
- Other products not manufactured by Epson may cause damage that is not covered by Epson’s warranties, and under certain circumstances, may cause erratic product behavior.
- This product requires careful handling of ink. Ink may splatter when the ink tanks are filled or refilled with ink. If ink gets on your clothes or belongings, it may not come off.
- To maintain optimum print head performance, some ink is consumed from all ink tanks not only during printing but also during maintenance operation such as print head cleaning.
- Do not open the ink bottle package until you are ready to fill the ink tank. The ink bottle is vacuum packed to maintain its reliability. If you leave an ink bottle unpacked for a long time before using it, normal printing may not be possible.
- If any of the ink tanks are not filled up to the lower line, refill the ink soon. Continued use of the product when the ink level is below the lower line on the tanks could damage the product.
Using the Head Cleaning utility for Windows
Follow the steps below to clean the print head using the Head Cleaning utility.Make sure that no warnings or errors are indicated in the control panel.
Right-click the product icon on the taskbar, then select Head Cleaning.
If the product icon does not appear, refer to the following section to add the icon.
Follow the on-screen instructions.
Using the Head Cleaning utility for Mac OS X
Follow the steps below to clean the print head using the Head Cleaning utility.Make sure that no warnings or errors are indicated in the control panel.
Access the Epson Printer Utility 4.
Click the Head Cleaning icon.
Follow the on-screen instructions.
Using the Print Head Alignment utility for Windows
Follow the steps below to align the print head using the Print Head Alignment utility.Make sure that no warnings or errors are indicated in the control panel.
Make sure A4-size paper is loaded in the rear paper feed.
Right-click the product icon on the taskbar, then select Print Head Alignment.
If the product icon does not appear, refer to the following section to add the icon.
Follow the on-screen instructions to align the print head.
Using the Print Head Alignment utility for Mac OS X
Follow the steps below to align the print head using the Print Head Alignment utility.Make sure that no warnings or errors are indicated in the control panel.
Make sure A4-size paper is loaded in the rear paper feed.
Access the Epson Printer Utility 4.
Click the Print Head Alignment icon.
Follow the on-screen instructions to align the print head.
Preventing paper jams
If your paper jams frequently, check the following.- The paper is smooth, not curled or wrinkled.
- The printable side of the paper is face up in the rear paper feed.
- The paper stack was fanned before loading.
- Do not load paper above the line just under the H arrow mark inside the edge guide.
- The edge guide is snug against the left edge of the paper.
- The product is on a flat, stable surface that extends beyond the base in all directions. The product will not operate properly if it is tilted.
EPSON L Series Printers Models
Epson EcoTank L3110, Epson EcoTank L3150, Epson Inkjet Photo L800, Epson L100 Inkjet Printer, Epson L110, Epson L120, Epson L200 All-In-One Printer, Epson L210, Epson L220, Epson L300, Epson L310, Epson L350, Epson L355, Epson L360, Epson L365, Epson L385, Epson L405, Epson L455, Epson L485, Epson L550, Epson L555, Epson L565, Epson L605, Epson L655, Epson L805, Epson L810, Epson L1110, Epson L1300, Epson L1455, Epson L1800, Epson L3116, Epson L3156, Epson L4150, Epson L5190, Epson L6160, Epson L6170, Epson L6190Operating system Support: Windows XP / Vista / 7 / 8 / 8.1 / 10 and Mac OS X 10.5.8 or later
File name: L1300_x64_212UsHomeExportAsiaML.exe
Note: Keep your hardware drivers up-to-date, and remember before installing any device driver to set a system restore point.